A Guide To Postpartum Exercise: Tips, Benefits & Workouts, From A Corrective Exercise Specialist
Pregnancy and childbirth are arguably the most intense physical endeavors a human being can take on. It would stand to reason that, like with any athletic event, training could assist for maximum success.
As a certified Pilates instructor and prenatal and postpartum corrective specialist, the question I often find myself asking is: "Why do so many prenatal and postpartum fitness classes focus just on restorative practices and not on actually building the strength and stamina required for motherhood?"
Of course, pregnancy and the postpartum period are physically draining, so pushing yourself too hard is counterproductive. Still, the last thing a busy new mom needs is ongoing incontinence, chronic back and hip pain, or the inability to lug a car seat up the stairs. The right type of training can dramatically increase a new mom's quality of life and experience in her body.
Benefits of postpartum exercise.
Exercise designed for the postpartum body can help with pelvic floor dysfunction, rebuilding core strength, and healing abdominal separation. It also aims to ease hip, back, and neck pain.
Your primary focus post-baby is restoring your deepest core and pelvic floor muscles, and part of this includes relearning how to breathe. Because the growing baby essentially pushes organs up into your diaphragm, you may have become accustomed to short, shallow breathing—this can prevent you not only from finding nervous system relief but also from using your core functionally. Learning to breathe three-dimensionally (into the pelvic floor, plus the side and the back ribs) will free up tension and make your core exercises more effective.
Intra-abdominal pressure also increases during pregnancy, as the growing baby causes the abdominal muscles to stretch, which ultimately means a weaker core. Intentional core exercises with breathwork integration will also support closure of abdominal separation, or diastasis recti.
Always consider the pelvic part of your core because even if you have a C-section, the pelvic floor has been supporting the weight of your baby for nine months and will need some focused training to prevent/heal pelvic floor pain and dysfunction.
Another important facet of postpartum exercise is posture correction. Carrying a growing baby for nine months can throw off your balance, cause tightness and compensation in the low back, overstretch the upper back, and even weaken the glutes. An expertly designed postpartum program should address these imbalances and work to help rebuild supportive posture—not just for pain relief but also to set you up for the physical demand of mom duties, like feeding and carrying baby (and the endless associated baby supplies!).
Guidelines for exercising postpartum.
"Functionally, it's about finding a connection to your deep core muscles, but more importantly, know it's a process, so be patient!" says Melbourne-based physiotherapist Chloe Gregor, P.T., of Pilates with GoChlo. She also advises working with someone who has specific training in this arena to concentrate on "pelvic floor activation, breathing, and deep core contraction. If you notice any leaking of urine or wind during exercise, it's usually a sign of a pelvic floor issue, so make sure you get assessed by a pelvic floor physical therapist or doctor."
Michele McGurk, P.T., WCS, PRPC, an APTA board-certified women's health clinical specialist in physical therapy, also recommends, if it's at all possible, moms seek out pelvic floor physical therapy at six weeks postpartum, to get ahead of symptoms and fast-track recovery before returning to regular exercise. McGurk believes preventive treatment can "facilitate their own healing process; address common postpartum symptoms like pelvic pain and urinary leakage; as well as prevent issues in the future."
8 exercises for postpartum recovery.
If you're looking for some specific exercises suited for a postpartum workout, check out the following moves. These are some of my favorite postpartum exercises that focus on rebuilding your strength and posture, to help feel your best as a new mom!
Relearn to breathe.
- Find a comfortable seated position. On the inhale, expand the sides and the back of the rib cage along with the low belly.
- Let the pelvic floor relax, using the same release reflex you use when you want to let a stream of urine flow (if you're nervous about controlling your bladder, try this in the shower first).
- On the exhale, visualize your torso wrapping, or corseting inward while lifting, not just squeezing, the pelvic floor for a deep core contraction.
- Repeat 10 to 15 times.
Neutral spine bridges
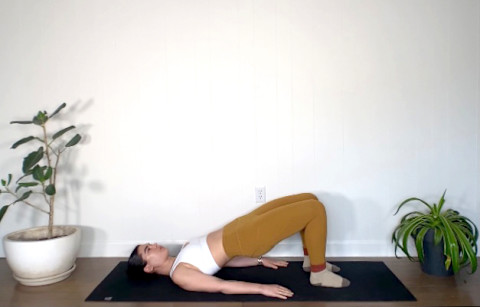
- Lie flat on your back with knees bent and feet hip-width apart.
- Exhale and slide the ribs toward the hips to engage the core. Squeeze the glutes and press the pelvis to the sky without arching the back.
- Inhale to pause and reach the knee caps forward and the hips away from the ribs to decompress the low back.
- Exhale to return to the floor as if hinging (no rolling).
- Repeat 10 to 15 times.
Neutral spine bird dog reach
- On all fours with shoulders stacked over hands and hips stacked over knees, exhale to hug the core in from all directions. Inhale to release the abdominals.
- On your next exhale, hug the core in and reach the right arm front and the left leg back, without twisting the shoulders or hips.
- Engage the glutes and hug the abdominals in to prevent the back from hyperextending.
- Inhale to reset, and repeat on the second side with the opposite arm and leg.
- Complete 10 to 15.
Kneeling side plank
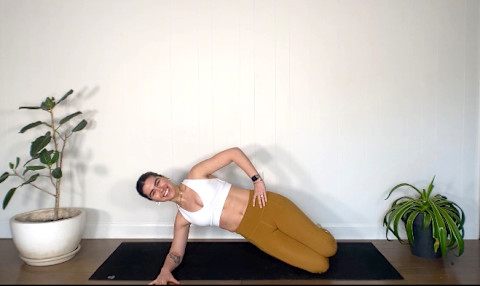
- Prop yourself up on your right elbow, with the elbow just underneath the shoulder, with knees bent.
- Exhale to push hips away from the ground while also lifting the armpit from the floor and driving the entire forearm into the floor.
- Hold for a moment to inhale, squeezing inner thighs together, then exhale to lower back to the floor with control.
- Repeat 5 to 10 times on the right and again on the left side.
Note: For more pelvic floor activation, add a prop like a ball or a block between the thighs for extra feedback as you squeeze inner thighs to lift up. Avoid straight leg side and front planks until abdominal separation is closed and/or you can maintain transverse abdominal activation throughout.
Neutral spine toe taps
- Lying flat on your back with feet flat on the floor and pelvis in neutral.
- Exhale to hug the core in from all directions (not just sucking in), and lift the right leg up to a tabletop/chair position without shifting the hips.
- Inhale to control the descent, and repeat on the second side.
- Repeat 5 times on each side.
Note: To progress, only once abdominal separation is closed, start with the legs in tabletop.
Side-lying leg lifts
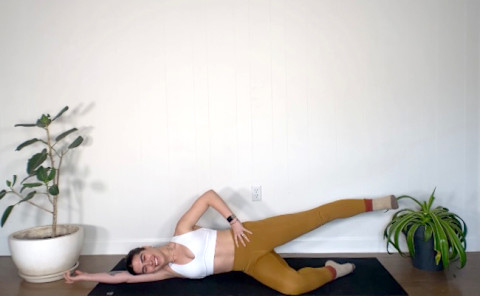
- Lying on your right side with your knees bent and your right arm extended out, acting as your pillow, reach the top (left) leg out straight at hip height.
- Without hiking the hip, lift the left leg up an inch, as if moving through honey, and down an inch.
- Actively reach the left leg long, as if pulling the hip away from the ribs to maintain pelvic stability.
- Repeat 10 times and again on the second side.
Wide row
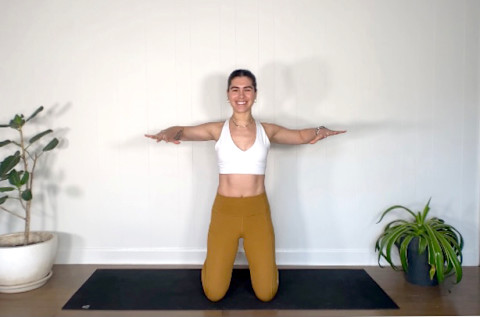
- In a kneeling, seated, or standing position, bring your arms out to the side, bent at 90 degrees, with palms facing down.
- As you inhale, reach the arms straight in front of you without rounding at the spine.
- As you exhale, draw the arms back to the start and squeeze between the shoulder blades without arching the back.
- Repeat 10 to 15 times.
Note: To progress, add weights, and repeat the series 3 times total.
Rotator cuff pull-aparts
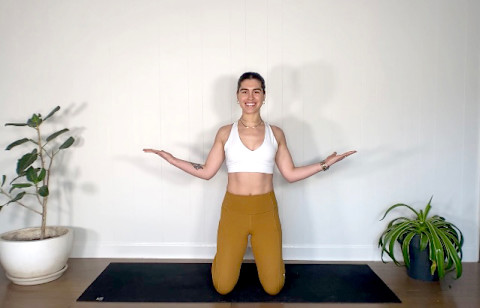
- In a kneeling, seated, or standing position, bring your elbows to your side with palms facing up.
- Exhale and pull the hands apart from one another with resistance, squeezing between the shoulder blades without arching the back.
- Inhale to draw the arms back to the start without slouching forward.
- Repeat 10 to 15 times.
Note: To progress, add weights, and repeat the series 3 times total.

