Advertisement
How To Contour Your Face In 5 Easy Steps + Insider Tips From Makeup Artists


Say it with me now: You don't have to be an expert makeup artist to master the art of contour. Yes, it can feel a bit intimidating at first, considering a few strategic strokes can literally change the shape of your face. But once you have the basic steps down pat? Oh, hello, cheekbones—nice to see you've come out of hiding.
Learn how to properly contour your face, and you can secure a sculpted look in about five minutes flat. Ahead, find our guide to help you place those precise lines, plus all the makeup artist tips you need to know.
What is contouring?
I'll leave it to makeup artist Naseeha Khan, co-founder of CTZN Cosmetics, to explain: "Contouring is a makeup technique that adds natural depth and dimension to your features by creating shadows and highlights in different areas of your face," she says.
Basically, by strategically placing those darker hues, you can create the illusion of depth and a chiseled bone structure. While brighter pigments (i.e., highlighter) help bring forth an area, using deeper shades will recede an area, which can help your cheeks, jawline, nose, etc., appear much more defined.
Now, you can use a proper contouring stick or palette to trace your facial features, but you can also contour with a cool-toned bronzer or even blush. "Contouring" really just means carving out certain regions of your face, which you can accomplish with a variety of makeup products.
How to contour your face
Ultimately, you might have a slightly different contour map depending on your face shape, as not everyone wants definition in the exact same places. Not to fret: We break down exactly how to achieve a chiseled contour below:
Step 1: Choose your contour product.
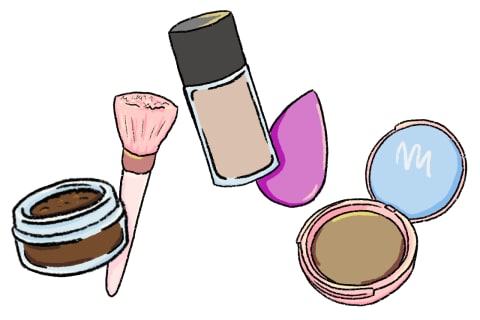
Again, choose whatever contouring items strike your fancy, be it a cream contour stick with a beauty blender or a bronzer with a fluffy brush. "The best type of product depends on your skin's natural oil levels," says Khan. "If you have [combination] or oily skin, you should opt for a powder contour, whereas if you have drier skin, cream or liquid contour may be better."
Although, a cream stick might be best for precise contouring, as you can use the edge of the product to trace defined lines—we adore this Milk Makeup Matte Cream Bronzer Stick. The Saie Sun Melt Natural Cream Bronzer is another buildable creamy option you can use with a fluffy blending brush, or if you're looking for a powder number, we love this pressed No Limits Matte Bronzer from LYS Beauty. As for the shade? "Choose a shade that is no more than two shades darker than your natural skin color," advises Khan.
Step 2: Carve the cheekbones.
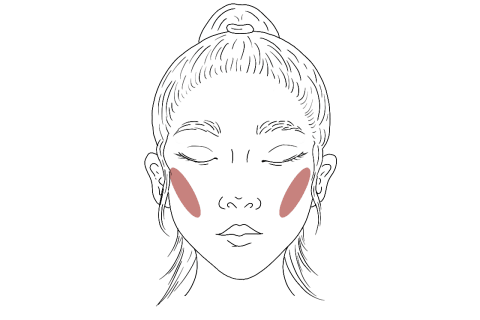
To enhance your cheekbones, makeup artist Asta Jurksaite suggests drawing a line starting from the top of your ear and moving toward your nose, ending right where your eye starts (she demonstrates in a TikTok video if you'd like a visual). Make the line precise and sharp—this is where a contour stick might come in handy so you can draw a defined line.
When blending, buff the product upward. "Blending the product up will help to lift your features, while blending downward will appear to drag your face down," notes Khan.
Step 3: Define the hairline.
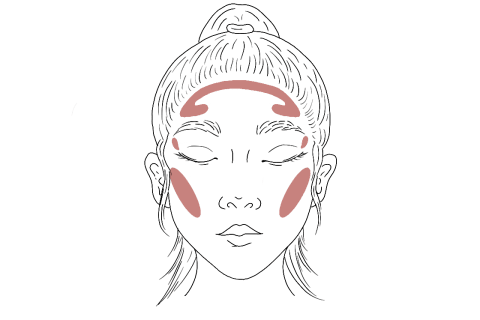
To define the hairline, you have a couple of routes: If your main goal is to elongate the face, Jurksaite recommends gliding the product along both sides of your hairline (without connecting them in the middle) and adding a short line on your temples, right where the brows end—this can create the illusion of a higher, diamond-shaped hairline.
Or if you'd like to shorten the face, swipe your contour across the top of your hairline in an upside-down "U" shape, and skip the lines on the temples. (You'll also want to add a short line on the bottom of your chin, but more on that in a moment.) That way, you can create shadow on the lengthiest parts of your face and focus the attention center. Again, here's a video demonstration if it helps to see her blend in real time.
Step 4: Define the jawline.
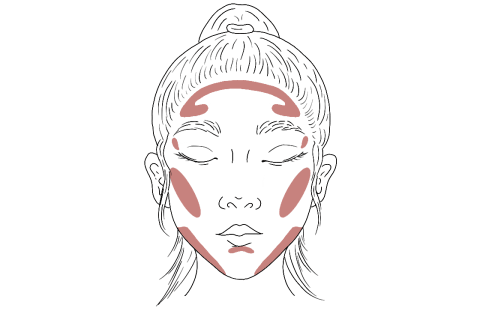
Next up: Sculpt that jawline. Trace short lines along the angles of your jaw, ending at the same point as those cheekbone lines above. If you'd like to shorten the face, you can also trace the bottom of your chin with a small line, but this is entirely optional.
Step 5: Apply blush and highlighter.
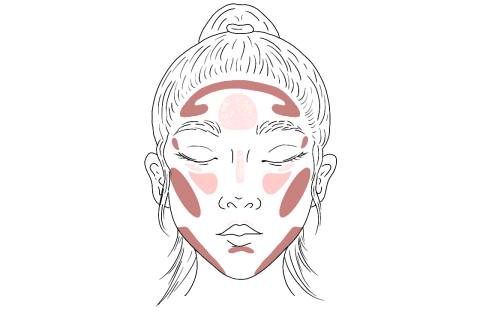
Once you have your contour all mapped out, you can pop some blush on those cheekbones (or along your hairline, if you're so inclined). We have a full guide to applying blush here, but you can never go wrong with sweeping the pigment in a "C" shape from the temples inward. Even just a dab on the apples of your cheeks can offer some warmth.
As for highlighter: "You simply want to add light to where you're trying to draw attention," celebrity makeup artist Mary Irwin tells mbg about applying the product. Dust a pearly number on your temples, your cheekbones, the bridge of your nose, and on your Cupid's bow to create the illusion of fuller lips.
Extra makeup artist tips
Now that you're familiar with the basic routine, here's how experts level up the look—plus, some cringey mistakes to avoid:
- Use a cool-toned product: OK, you could technically use a bronzer to contour your face, but it's important not to pick something too warm and sunny, here. "The idea is to mimic the shadows of your face and minimize parts of it to appear smaller or more refined," says Khan. So if you do choose a bronzer, make sure it's a cool-toned product. Better yet, swatch it to make sure it fuses to the natural shadows in your skin.
- Contour your nose and mouth, if you choose: Khan recommends drawing perpendicular lines down the sides of your nose, then adding a horizontal line at the tip to connect the two. Diffuse with a small blending brush, and use outward and upward circular motions. "For an added pout, draw a small line just under your bottom lip," she notes, as the illusion of shadow can mimic extra volume.
- Make sure to blend well: "The most common mistakes I notice are people choosing contour shades that are too dark for their skin tone or not blending out their product all the way," Khan adds. A stark contour line takes away from a natural-looking finish, no? If you find it difficult to blend the product out, Jurksaite recommends using some setting spray on your blender or brush to help diffuse the pigment.
- Keep a hydrated base: A great makeup look starts with a hydrated skin base, full stop. Not to mention, hydrated, supple skin shines in all the right places, which can make it easier for you to identify where you'd like to create some shadow versus letting the dew live on. Find all of our tips to keep your skin hydrated here, including both topical and internal methods.
The takeaway
Don't shy away from contour! Once you learn the basics, it's not too difficult to master a sculpted look. Feel free to browse our favorite contouring products here, or you can always use a cream blush to carve your cheekbones; you can learn how to blush-contour here.